Thursday, June 19, 2014

Cottage Style Kitchen - Before and After

I'm finally posting some before and after photos from the cottage style kitchen and great room renovation we did. The project really turned out beautifully! Our client purchased this home years prior near the beach and had always envisioned transforming the 80's style decor/layout into an open concept cottage style interior. Our client also loves to cook, so the function and layout of the kitchen played a major role in the new plan. 

We were so glad she chose us to help bring her dreams to reality! Here is the conceptual floor plan sketch.

Concept Plan with Notes

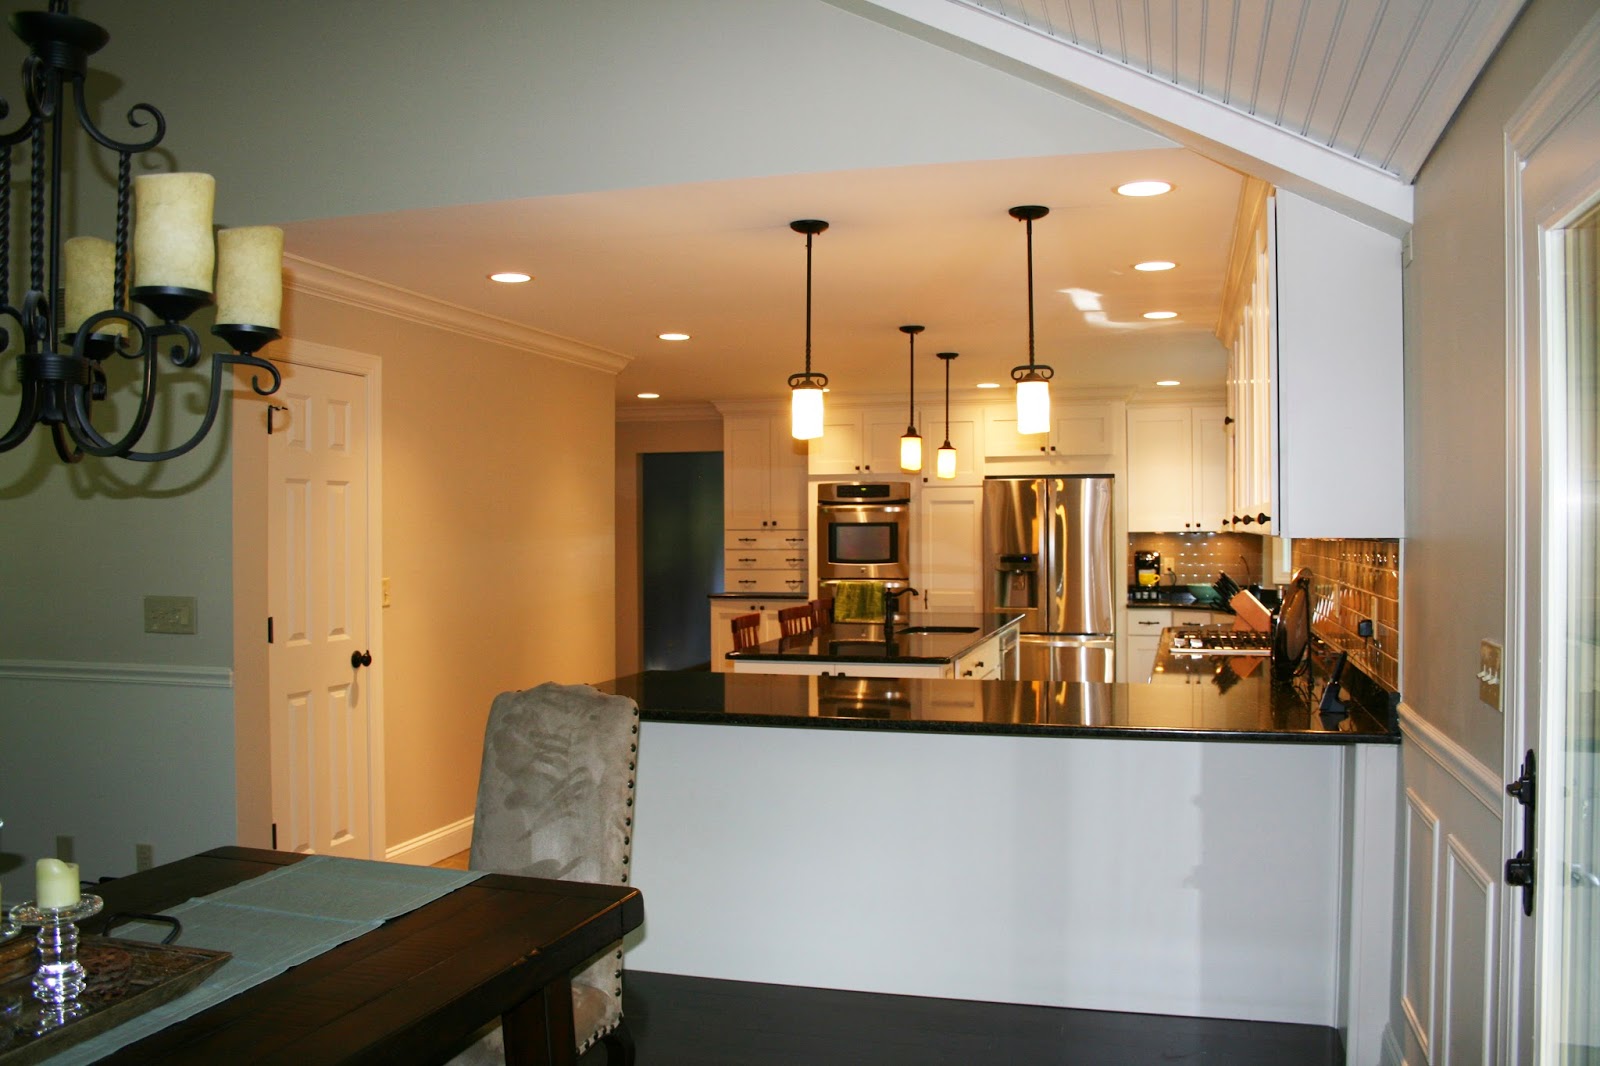
Here is a photo of the finished great room. 
{Just lovely}

Finished Great Room & Dining Room
Conceptual design sketch

Below is a photo of the kitchen before the renovation.
The photo on the left shows a wall behind a peninsula island... 
we completely removed that wall to open up the kitchen to the dining and living area beyond.

kitchen before
a dark and somewhat closed off space
The photo on the right shows the new open kitchen plan
with a true island (no more enclosed peninsula madness)!

A lot of older homes like this have little nooks and crannies that become seemingly useless space over time. In this renovation, we made sure to take advantage of every bit of the interior... transforming those wasted areas into useful, functional space! 

In the photo below, you'll see a bay window that faces a beautiful wooded back yard. 
Unfortunately no one ever really used that window... even the loveseat faces away from the view!

We ended up replacing those tall windows with shorter above counter windows and locating the kitchen sink there to take full advantage of the view. 
I know it sounds "sad" to remove those tall windows... 
but I assure you the extra 12" of glass did no good if no one used them!


The living and dining areas of this home also needed some major updating.
Take a look at the old rounded drywall fireplace mantle below... very unique to say the least!

living area before
living area after!
what a transformation!!!

By adding the wood to the ceilings and a central decorative beam, 
we were able to hide wiring for a chandelier above the dining room table. 
We also added wood wainscoting and painted the existing patio doors.

dining room before
the wall to the left with the china cabinet was removed completely...
allowing views to the kitchen
dining room after
this view shows the open wall to the kitchen area
dining room after
[viewing from kitchen]
dining room after
[viewing from front door]
The main foyer of the home also needed updating.
I love how it turned out!


lamp love

Last summer I bought four lamps at a neighbors garage sale. 
I refinished two of them in classic white... 
and I absolutely love how they turned out. 
These two are actually touch lamps, remember those? 
And they still work with a few coats of paint :)

[lamp love]

<3

before
after!
LOVE the detail!


Thursday, August 15, 2013

closet madness

Here's a little reorganizing project to inspire you. 
A few bins from Target can take you from closet madness to closet utopia.

before
(without saying, right?)

and yet another sad before photo...
I didn't want to leave out the random paper towel rolls

and after...
everything has it's place

Wednesday, June 19, 2013

diy burlap ottomans

My best friend and I were google searching like mad for a couple square ottomans for her living room. She wanted something unique, somewhat rustic and since she has 6 kiddos, it had to be durable. We also didn't want to break the bank. As you can imagine, it was a hard find. 

After some searching we got a little obsessed with burlap... 
and in the end decided to make something ourselves out of the burlap seed sacks from her husband's farm. They might be a little overbuilt (very heavy)...but at least her little ones can't move them all of the place!

This was the beginning sketch;
it ended up varying slightly as the design progressed.
It's basically an mdf box with little rubber furniture feet from Home Depot. 
I bought some 1" upholstery foam and glued it to the outside of the box. 
We found the cleanest used seed bags we could and cut them into strips a little wider than each side. Then folded the edges, glued them and stapled the fabric on the inside top edge and along the bottom.
For the top, we cut up some old wood from their barn.
We did end up making these storage ottomans...so the tops are removeable.


Thursday, December 6, 2012

diy burlap wreath

 
We were recently introduced to burlap wreaths!  And fell in love immediately of course.  I decided to make a holiday gift project out of our new discovery and just finished making NINE as Christmas gifts for family and friends.  I made sure to hand them out at Thanksgiving so everyone could display them during the holidays.

It only took about two evenings to complete.  And by two evenings, what I really mean is that I worked on them on my living room floor while toddlers excitedly rummaged thru all of my supplies and did their best to "help".  By the end my four year daughter was arranging her own clusters of beads, tilting her head and saying...this looks beautiful, right Mommy?  It was actually a delightful evening or two!

I decided there are enough tutorials on "how to make a burlap wreath" out there...so why crowd blogspace with my own rendition of exactly the same directions. 

Here's the blog I used:
http://www.lifeonmarsblog.net/2012/03/easy-burlap-wreath.html

I varied it a little during my mass production though.  I was using burlap twine and hot glue by the end to adhere my embellishments...the wire just wasn't working for me :)

Here are some photos of row + harlow wreaths...


Tuesday, October 2, 2012

diy beaded chandelier

We were recently searching for an inexpensive / easy to transport / chic chandelier for a friend's out of town wedding...and as you can imagine there wasn't a lot to choose from.  The bride wanted a fixture to bring an ambience to their barn reception...not necessarily using it as "light" but more as a design element within the space.  Finally, about 5 days before the wedding, we decided to just make our own!

We did some internet research on do it yourself chandeliers and eventually decided upon a beaded chandelier (see link below).  We quickly headed to our local Lowes for a hanging wire basket and spray paint, and also to the local dollar store for an insane quantity of beaded necklaces.  
If you try to make your own, I highly recommend purchasing necklaces close to the color you are spray painting.  For our chandelier, we wanted it to be a mix of off-white and khaki, so we used silver and gold colored necklaces.  This will save you time in the end...you won't need to paint coat upon coat for coverage.

http://dollarstorecrafts.com/2010/05/make-a-beaded-chandelier/
image from tutorial...fun color!
We're considering repainting our chandelier to a bright color now that the wedding is over and we don't need it to be white anymore...maybe a bright yellow or blue like in the image shown above.  Here are some shots of the one we made...we'll post the pictures from the wedding photographer once we have them [udpated photo below]!


final installation


Monday, September 3, 2012

phase one - cottage style great room

We just completed construction on phase one of living room and kitchen remodel project! To give you some background, our client bought an early 90's style home in a great location (Ogden Dunes...yep, near the beach!), always dreaming of updating the interior but having a hard time getting things moving. She was open to just about anything...which was very exciting for us. 

They wanted to open up their existing kitchen (see image below) which was small, closed off and a little awkard.  They also wanted update their living room fireplace and foyer area.  She had a picture cut out of a magazine she had been carrying around for awhile which showed the style she was looking for.  It was a modern cottage/beach style interior...which we totally loved as well.  It was very fitting for the area they lived in and since their home had great "bones", we really had a lot to work with.

existing kitchen...not a lot of counter space
and very closed off
existing kitchen bay window...
wasted space and not really used


existing living room...nice cathedral clgs and large windows
but not a lot of character at this point

check out this curved fireplace mantle...
made of drywall!
existing foyer and stair

existing foyer light
 
 
Design Concept:

Floor Plan

Rendered Perspective
Entry view from Foyer to new stone fireplace

Rendered Perspective
View from Fireplace to new open kitchen bar


Rendered Perspective
Entry into Kitchen with island and coffered wood ceiling
Rendered Perspective
View from Kitchen bar to Great Room

 Finished Great Room (Phase 1)
Finished Great Room
Look at those beautiful wood floors
and the the new fireplace w/built-ins!

Updated Foyer
New wood treads on stairs, wood
wainscoting and chandelier