Thursday, December 6, 2012

diy burlap wreath

 
We were recently introduced to burlap wreaths!  And fell in love immediately of course.  I decided to make a holiday gift project out of our new discovery and just finished making NINE as Christmas gifts for family and friends.  I made sure to hand them out at Thanksgiving so everyone could display them during the holidays.

It only took about two evenings to complete.  And by two evenings, what I really mean is that I worked on them on my living room floor while toddlers excitedly rummaged thru all of my supplies and did their best to "help".  By the end my four year daughter was arranging her own clusters of beads, tilting her head and saying...this looks beautiful, right Mommy?  It was actually a delightful evening or two!

I decided there are enough tutorials on "how to make a burlap wreath" out there...so why crowd blogspace with my own rendition of exactly the same directions. 

Here's the blog I used:
http://www.lifeonmarsblog.net/2012/03/easy-burlap-wreath.html

I varied it a little during my mass production though.  I was using burlap twine and hot glue by the end to adhere my embellishments...the wire just wasn't working for me :)

Here are some photos of row + harlow wreaths...


Tuesday, October 2, 2012

diy beaded chandelier

We were recently searching for an inexpensive / easy to transport / chic chandelier for a friend's out of town wedding...and as you can imagine there wasn't a lot to choose from.  The bride wanted a fixture to bring an ambience to their barn reception...not necessarily using it as "light" but more as a design element within the space.  Finally, about 5 days before the wedding, we decided to just make our own!

We did some internet research on do it yourself chandeliers and eventually decided upon a beaded chandelier (see link below).  We quickly headed to our local Lowes for a hanging wire basket and spray paint, and also to the local dollar store for an insane quantity of beaded necklaces.  
If you try to make your own, I highly recommend purchasing necklaces close to the color you are spray painting.  For our chandelier, we wanted it to be a mix of off-white and khaki, so we used silver and gold colored necklaces.  This will save you time in the end...you won't need to paint coat upon coat for coverage.

http://dollarstorecrafts.com/2010/05/make-a-beaded-chandelier/
image from tutorial...fun color!
We're considering repainting our chandelier to a bright color now that the wedding is over and we don't need it to be white anymore...maybe a bright yellow or blue like in the image shown above.  Here are some shots of the one we made...we'll post the pictures from the wedding photographer once we have them [udpated photo below]!


final installation


Monday, September 3, 2012

phase one - cottage style great room

We just completed construction on phase one of living room and kitchen remodel project! To give you some background, our client bought an early 90's style home in a great location (Ogden Dunes...yep, near the beach!), always dreaming of updating the interior but having a hard time getting things moving. She was open to just about anything...which was very exciting for us. 

They wanted to open up their existing kitchen (see image below) which was small, closed off and a little awkard.  They also wanted update their living room fireplace and foyer area.  She had a picture cut out of a magazine she had been carrying around for awhile which showed the style she was looking for.  It was a modern cottage/beach style interior...which we totally loved as well.  It was very fitting for the area they lived in and since their home had great "bones", we really had a lot to work with.

existing kitchen...not a lot of counter space
and very closed off
existing kitchen bay window...
wasted space and not really used


existing living room...nice cathedral clgs and large windows
but not a lot of character at this point

check out this curved fireplace mantle...
made of drywall!
existing foyer and stair

existing foyer light
 
 
Design Concept:

Floor Plan

Rendered Perspective
Entry view from Foyer to new stone fireplace

Rendered Perspective
View from Fireplace to new open kitchen bar


Rendered Perspective
Entry into Kitchen with island and coffered wood ceiling
Rendered Perspective
View from Kitchen bar to Great Room

 Finished Great Room (Phase 1)
Finished Great Room
Look at those beautiful wood floors
and the the new fireplace w/built-ins!

Updated Foyer
New wood treads on stairs, wood
wainscoting and chandelier

Sunday, August 5, 2012

kitchen and living remodel

This summer we completed a conceptual design for a kitchen and living remodel.  Our client was originally just asking for help with paint colors...and of course I had to laugh!  Not that we couldn't help with just colors (we do that from time to time), but we could do so much more!  I really just wanted to get a feel for what she really wanted for the space...what she loved about her home, what she didn't love, and ultimately what sort of design aesthetic she was attracted to.
 
          Design Concept: 
repaint existing oak kitchen cabinets black
paint all existing cabinet pulls silver
repaint all wood trim white
install wood flooring thru-out
add a white wood wainscot with a chalkboard wall
built-in shelf for coffee display
install a tile backsplash
add a drum pendant light over kitchen table
a rug to "ground" the table
add a furniture style island with pendant lighting
(there is so much wasted space in the middle of the kitchen)
remove all existing drapery and install white blinds
remove all wood chairrail and wall covering borders and repaint walls
add white wood bookcases on both sides of fireplace
install track lighting to accent photography in specific locations
keep existing lamps, just replace the shades
add a shag rug to living room
buy one accent chair for reading in living room
and finally, a paint scheme of dark gray, tan, white, yellow and coral

Well, at first she was a little shell-shocked at all of the ideas...especially since she was just asking for paint colors. But she was also very much in love with all the ideas and the possibility that her home could actually be something better than she ever imagined! She also didn't think her husband would ever get on board...especially with the idea of painting the kitchen cabinets.

A few days later she called me from the paint store and they were already buying the paint! I think in the end her husband really came around because we were able to visually show him our intent thru our conceptual designs and images.  And if you look back at our design concept, there isn't a whole lot of new and expensive items...besides the built-in bookcases, wood floors, and painting the cabinets.  I don't think they ever went thru with the wood floors either.  But the rest was enough to completely change their space anyway!

Conceptual Drawings: 
Floor Plan Design Concept
Rendered Perspective of Kitchen & Living Room

Rendered View of Kitchen Entry to Living Room
Rendered View of Living Room Client Viewing Wall

Rendered View of Fireplace with Built-ins

Rendered View of Chalkboard / Wainscot Wall

Rendered View of Kitchen with Island


Before and After Photos:
existing oak cabinetry
 
painted cabinets!
no wall paint, backsplash or cabinet pulls just yet
 
close up of painted cabinets with pulls...looking good!

existing wood and brass cabinet pull...eeek

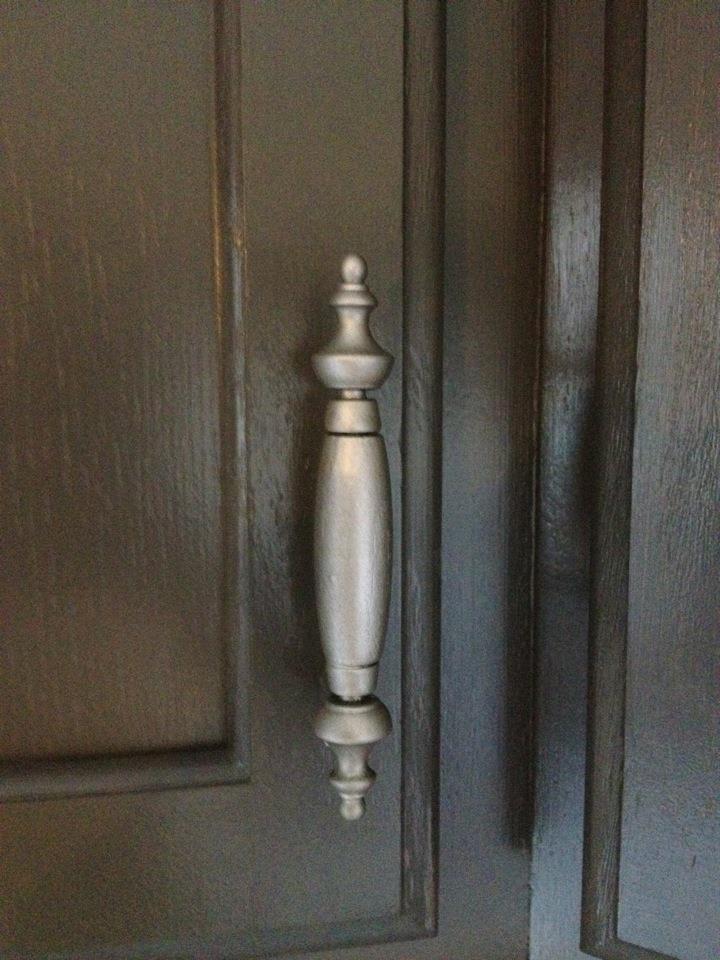
silver spray painted cabinet pull!
wood wainscot under way
 
chalkboard wall
 

Wednesday, May 30, 2012

a fresh coat of paint

A client of ours was interested in updating the exterior
colors of their home.  Their first thought was to go with something gray with a darker gray trim, sort of similar to their existing colors (tone on tone). 
We loved the idea of a dark gray base but challenged them to go outside their comfort zone and consider using a white/off white trim for a better contrast and more updated look. 
 
It took some convincing and a few rounds of paint samples, but in the end I think they were more than pleased!  We've been told they've had multiple neighbors comment again and again on how amazing their house looks.
 
They ended up going with a dark gray exterior paint, a light trim, a black roof, and a black front door.  Doesn't it look amazing? 
 
We'll have to go back this spring and get a full front elevation photo for a better side by side comparison.
 
Existing blue gray exterior

Some color options

Finished and fabulous.
A beautiful dark gray!!